
Now that you’ve logged in to your Gateway, you can join sensors to it so that you can start collecting data. The sensors communicate with the Gateway using a protocol called EnOcean.
EnOcean is a low-bandwidth, low-power protocol, which allows the sensors to operate on a tiny amount of power, conserving batteries for many years. As a result, EnOcean traffic is one-way. There is no handshake or acknowledgement between the sensor and the Gateway. The sensors talk, the Gateway listens.
The sensors come in three varieties:
- Self-powered – these sensors draw power from the magnetic field generated by flowing current.
- Line powered – these sensors have an external power supply, usually from the mains.
- Battery powered – these sensors use batteries (included) and don’t require external power.
Self-powered sensors
The sensors must be powered on in order to join them to the Gateway. In the case of the self powered sensors, this means that they must be installed on to a live conductor, so that they are able to power the transmitter.
Tip: See the manual for the CT Clamp sensors for instructions on how to power these sensors before joining them to the Gateway.
Line / Battery powered sensors
First, ensure that the sensors are powered and switched on. Battery powered sensors have batteries fitted at the factory, but are switched off for shipping. You can find the power switch on the sensor itself. Line powered sensors must be powered before joining them to a gateway.
Connecting a Pressac device for the first time via Learn button
Now log in to the Gateway interface, and select “Enocean” to see the list of sensors. The first time, this list will be empty. Click on “- Devices”.
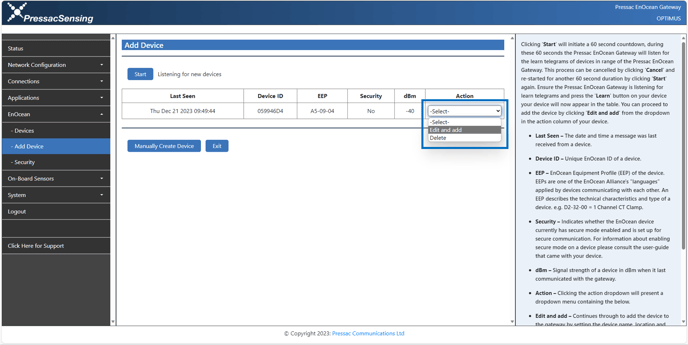
This takes you to the “- Add Device” page. Click “Start” in the EnOcean sub-menu and the Gateway will begin a 60 second process of listening out for “Learn” messages sent from the sensor.
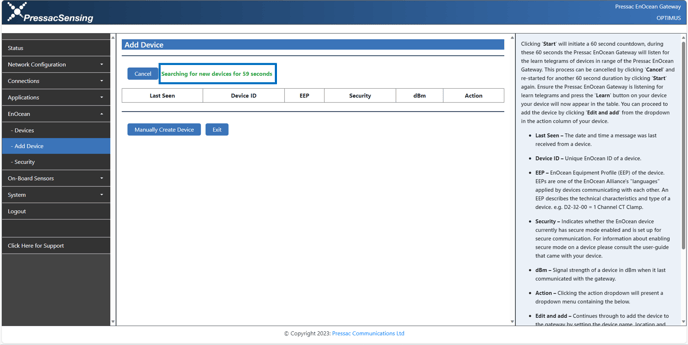
This 60-second countdown indicates that the Pressac EnOcean Gateway will listen for the learn telegrams of devices within its range. This process can be cancelled by clicking “Cancel” and re-started for another 60-second duration by clicking “Search” again.
Ensure the Pressac EnOcean gateway is listening for learn telegrams and press the “Learn” button on your Pressac device.
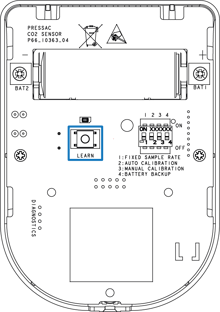
Note: To locate the Learn button for your device please consult your device’s manual.
In this example we will be using the Pressac CO₂ , temperature and humidity sensor. This device’s Learn button can be exposed by removing the CO₂ , temperature and humidity sensor back plate as shown in the image below:
During this 60 seconds, press the “Learn” button on the sensor you wish to join to the Gateway.
A new device entry will now appear in the table below:
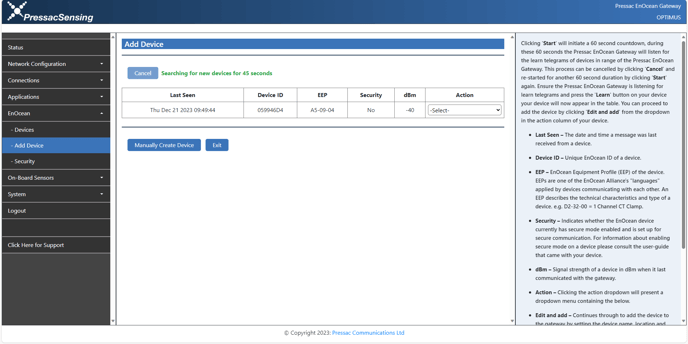
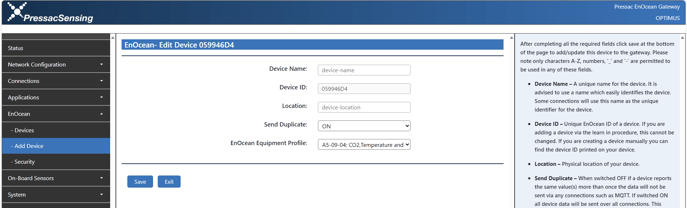
Select “Edit and Add” from the menu under the "Action" column as shown in the above image to edit the device. A new screen will appear as shown in the image below.
Tip:
- Device Name – this uniquely identifies the sensor.
- Device ID – the EnOcean ID of the sensor (cannot be changed).
- Location – an optional field to categorise different sensors.
- Send duplicate – on motion sensors, this setting controls whether to continue to report if the status hasn’t changed.
- EnOcean Equipment Profile (EEP) – this allows you to select between different motion sensor types, such as desk, table or room.
The only required field is the "Device Name". This is the identifier which will be used to identify your device. It is advised to use a device name which resembles the function and location of the device. e.g. If your device is a CO₂ , temperature and humidity sensor and it is situated in Classroom 1, your device name could be “Classroom1-CO2-Temperature-Humidity”.
Other optional properties include the location of your physical device. Please note that only characters A-Z, numbers, ‘_’ and ‘-‘are permitted to be used in any of these fields.
Once you have specified your desired device name and any of the other optional properties click “Save” at the bottom of the screen to save the entry.
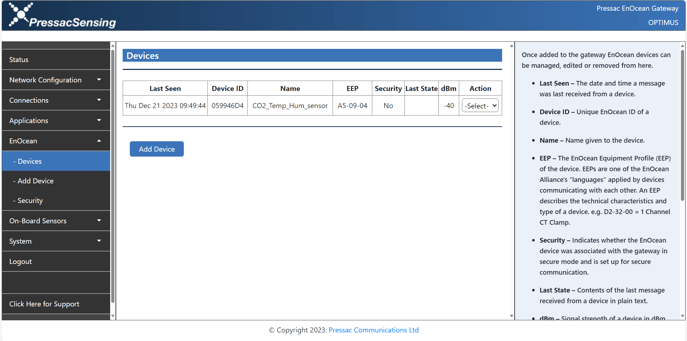
You can now navigate to the "- Devices" page and see the device along with its last state.
Now you can enter some details about the sensor.
Under “Last Seen” you can see the most recently seen data, time and date the sensor last reported.
Tip:
- Last seen – The date and time the Pressac EnOcean gateway last received a telegram from the device.
- Device ID – The unique identification number of the device.
- EEP – EnOcean Equipment Profile used by the device.
- Security – Security enabled on the device Yes / No.
- dBm – Signal strength of the device to the gateway.
- Action – The action column contains a menu containing options to EDIT AND ADD and DELETE the device.
The sensor is now added to your Gateway, and can be seen in the “– Devices” section.
You can repeat the above process for any additional sensors.
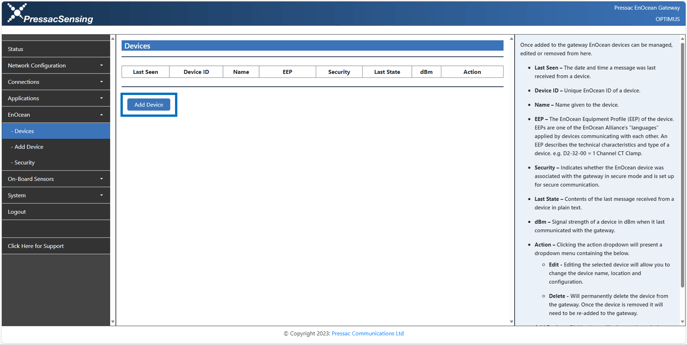
Device list
To view the EnOcean device list click “– Devices” in the EnOcean sub-menu on the Pressac EnOcean gateway web-interface.
This will then take you to a page which will show all the devices which are currently added onto the gateway.
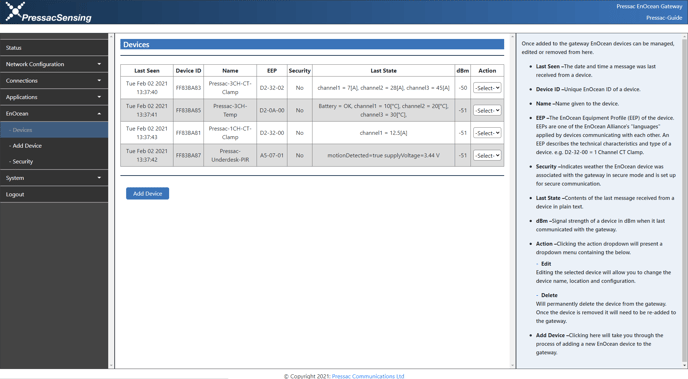
Here you can see all the information regarding the sensors you have. You can also edit the information you inputted when you initially added them or delete the device from the gateway, which you can do by clicking the drop-down menu under “Action”.
- Last seen – The date and time a message was last received from a device.
- Device ID – Unique EnOcean ID of a device.
- Name – Name given to the device.
- EEP – The EnOcean Equipment Profile (EEP) of the device. EEPs are one of the EnOcean Alliance’s “languages” applied by devices communicating with each other. An EEP describes the technical characteristics and type of a device. e.g. D2-32-00 = 1 Channel CT Clamp.
- Security – Indicates whether the EnOcean device was associated with the gateway in secure mode and is set up for secure communication.
- Last state – Contents of the last message received from a device in plain text.
- dBm – Signal strength of a device in dBm when it last communicated with the gateway.
- Action – Clicking the action drop-down will present a drop-down menu containing the below:
- Edit – Editing the selected device will allow you to change the device name, location and configuration.
- Delete – Will permanently delete the device from the gateway. Once the device is removed it will need to be re-added to the gateway.
- Add device – Clicking here will take you through the process of adding a new EnOcean device to the gateway.
Adding devices via manually create device
To manually create a new device, click “– Add Devices” in the EnOcean sub-menu on the gateway web-interface and then click “Manually Create Device”.
To do this, you need to get the information of your device from the identification sticker on your device.
The information you will need from the sticker is:
- Device ID – Unique EnOcean ID of a device. If you are adding a device via the learn in procedure, this cannot be changed. If you are creating a device manually you can find the device ID printed on your device.
- EnOcean Equipment Profile – Select the EnOcean Equipment Profile (EEP) for the device. EEPs are one of the EnOcean Alliance’s “languages” applied by devices communicating with each other. An EEP describes the technical characteristics and type of a device.
Once you have this information you will need to populate the fields on the “Manually Create Device” page which will be:
- Device name – A unique name for the device. It is advisable to use a name which easily identifies the device. Some connections will use this name as the unique identifier for the device.
- Device ID – Unique EnOcean ID of a device. If you are adding a device via the learn in procedure, this cannot be changed. If you are creating a device manually you can find the device ID printed on your device.
- Location – Physical location of your device.
- Send duplicate – When switched OFF, if a device reports the same value(s) more than once the data will not be sent via any connections such as MQTT. If switched ON, all device data will be sent over all connections. This option becomes very useful when network connection bandwidth is limited.
- EnOcean Equipment Profile – Select the EnOcean Equipment Profile (EEP) for the device. EEPs are one of the EnOcean Alliance’s “languages” applied by devices communicating with each other. An EEP describes the technical characteristics and type of a device.
- Security – When adding a device manually, if standard EnOcean device security is required this will need to be input manually.
- RLC – Rolling code of the device being added.
- SLF – The security level format of the device being added.
- KEY – Security key of the device being added.
Now you have entered the information click “Save”, then you will be redirected to the “- Devices” page and you should see the device you manually added in the list of devices.
Adding devices via remote management
Note: You can find how to add a device to the gateway using remote management in our remote management guide.
Security
To change the security level of devices in secure mode click “– Security” in the EnOcean sub-menu on the Pressac EnOcean gateway web-interface.
Some EnOcean devices include an enhanced secure mode. When secure mode is turned on, and the device is taught into the gateway, all device communication is encrypted. This security also utilises rolling code to prevent replay attacks. If messages are missed rolling code can become out of sync. Here you can set your own threshold for what is acceptable.
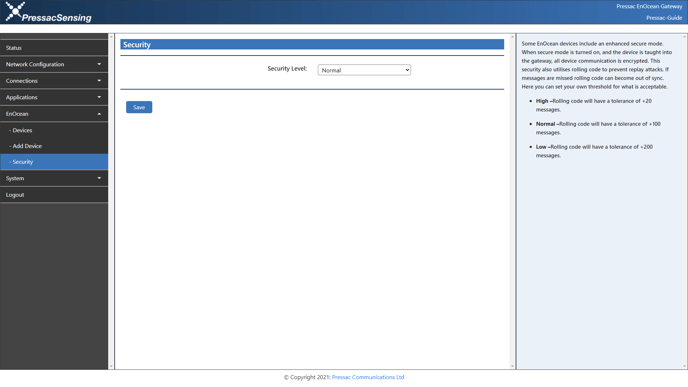
- High – Rolling code will have a tolerance of +20 messages.
- Normal – Rolling code will have a tolerance of +100 messages.
- Low – Rolling code will have a tolerance of +200 messages.