
Once you’ve looked at your floor plans and established where to put your gateways and repeaters, you need to do some on-site testing before installing your sensors.
Why carry out on-site testing?
Sometimes floor plans are out of date, or don’t show everything in a building. If you install your gateways purely on the basis of a floor plan you could end up with things like walls or pillars blocking signals – which in turn, makes it seem the sensors aren’t working properly.
Think of it as WiFi. At home, you may find the WiFi is better in one room than another. You may also need to install boosters to get coverage across your whole house. This is exactly the same principle – and actually carrying out manual testing can show you where coverage may be a little shaky and where you might need an extra gateway or repeater.
The best way to test your sensors is in a ‘real-world environment’, e.g. the place they’re going to be installed. Below is an outline of how to use DolphinView to do this.
Essentially, this turns your laptop into a pseudo gateway. Plug in your USB stick to act as a receiver and position your laptop where you have allocated a gateway to go from your floor plan inspection. You can assume a good coverage of 10 metres, so you really only need to check sensors on the edges of this distance.
DolphinView
Install DolphinView – DolphinViewAdvanced_3880.exe (from EnOcean)
Insert EnOcean USB
| USB 300 | 868MHz |
| USB 300U | 902MHz |
| USB 400J | 928MHz |
Launch DolphinView from the desktop icon, which looks like this:

The COM port and EnOcean ID of the USB 300 is shown in the yellow highlighted box. If you’re using multiple USBs you can select each on from the drop-down menu.
The connect/disconnect buttons enable the communication between the software and the USB stick. Every time the software is started you need to press the connect button to enable comms. Pressing disconnect stops the comms. This is handy if you just want to pause with the last received messages on the screen.
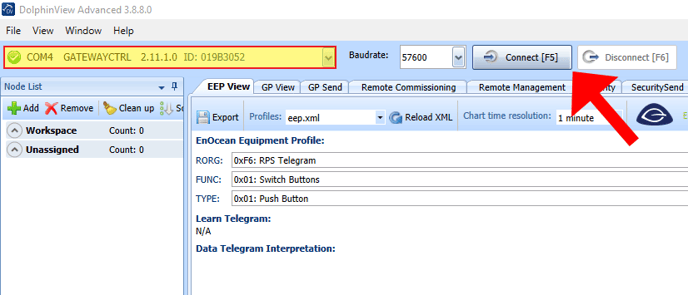
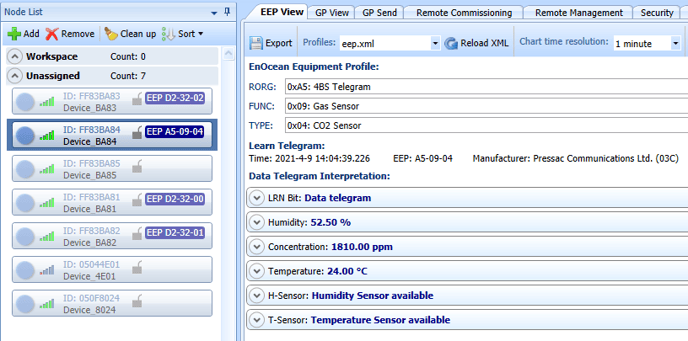
To view sensor data and radio testing, select the EEP view tab (this is normally selected by default when the software is opened).
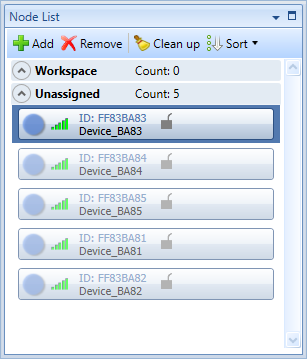
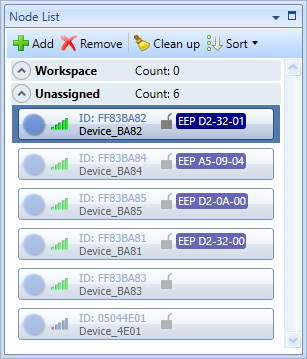
Any sensor that sends a message in radio range of the connected USB stick will appear in the unassigned workspace. Double clicking on this sensor will add it to the assigned workspace – useful if you have lots of sensors in range.
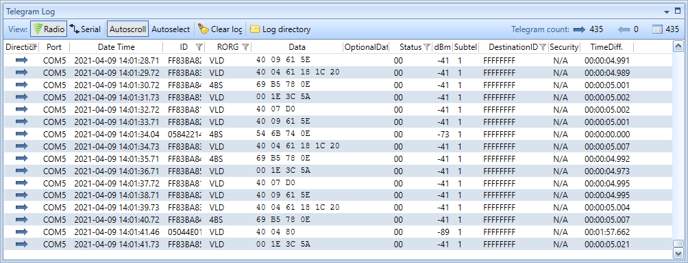
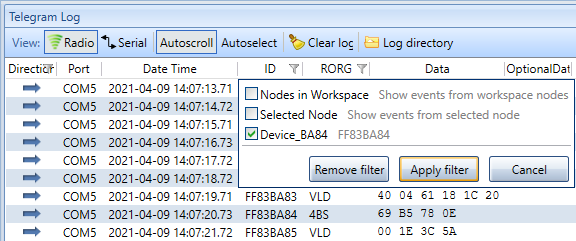
All of the received telegrams are shown in the telegram log.
Pressing a learn button on a sensor (causing the sensor to transmit a learn telegram) lets the DolphinView software receive the sensor EEP information. This is displayed in the work space.
Once the DolphinView program has this information it can correctly parse the telegram received from the sensor.
You can filter telegrams shown in the telegram log by clicking on the column headings. To select individual devices, first add them to the assigned workspace. Then you will just see this telegram. All other telegrams will be received but not shown in the log window. Just removing the filter to see all telegrams received.
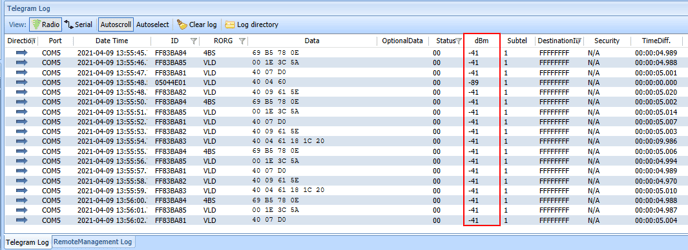
The dBm column in the telegram log shows the received signal strength from the sensor
-45 best
-90 worst
Post deployment
You need to do a little housekeeping to make sure you’re getting the best from your sensors. First, set up your software to alert you if the batteries are running low. This will only be possible if the EEP for the sensor supports battery voltage.
Warning: We’d also recommend, you to let everyone in your office know what the sensors are.
It’s been known for people to remove them from their desks thinking they’re being spied on – just some communication to let them know they’re not being filmed or personally monitored can help here.
In the same vein, sometimes the sensors are removed if work (such as electrical work) is being carried out. A ‘do not remove’ note is all it takes here.