
Product description
The Pressac Indoor Air Quality (IAQ) sensor measures and reports a variety of environmental factors:
- Carbon Dioxide level.
- Relative Humidity.
- Temperature.
- Particulate Matter.
- Volatile Organic Compounds.
The sensor is designed to be permanently installed, providing up to date and historical data on the air quality in the area being measured.
The IAQ outputs data using the EnOcean protocol, a low-power short-range wireless protocol containing current values for each of the factors being measured. These data packets or “telegrams” can then be received by a compatible receiving device such as the Pressac EnOcean Gateway, which translates them into useful data to be passed on to a cloud-based back-end system.
Installation
Physical Installation
As it is sensing environmental conditions, the placement of the IAQ sensor is crucial to the accuracy of the data received.
The IAQ sensor should be positioned in an area indicative of the air quality in the surrounding area – placing it close to a door or window, or close to any ventilation equipment or heat source might cause the device to produce inaccurate readings.
To obtain accurate CO₂ readings indicative of the area, the device should be installed on a wall at a height of approximately 1.8m. CO₂ is denser than air and will settle lower down, so a sensor installed on a ceiling, or near ground level will not provide an accurate representation of the CO₂ and other environmental levels around head height.
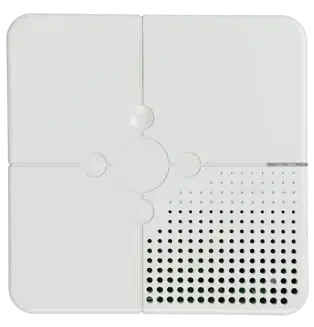
To obtain accurate readings for Particulate Matter values, the sensor has been designed such that the vent through which this sensor takes its readings should be pointed towards the floor. Ensure that the sensor is oriented as shown:

Backplate Installation
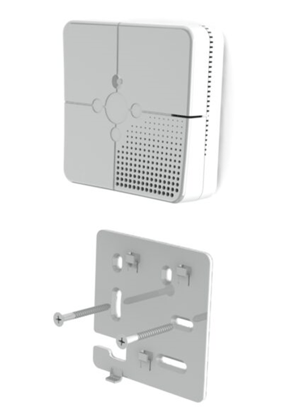
The Pressac Indoor Air Quality Sensor is designed to be wall mounted. For ease of installation, it is supplied with a backplate that can be mounted on the wall prior to installation of the Indoor Air Quality sensor itself.
The backplate can be wall mounted either using the screws and wall plugs provided, or alternatively it can be mounted over an existing ‘pattress’ box using the appropriate machine screws (not provided).
Before mounting the Pressac Indoor Air Quality sensor on the backplate, ensure that the commissioning and registration of the device is already complete, as the DIP switches and learn button will not be accessible after the sensor is installed on the backplate.
Commissioning
The sensor needs to be commissioned before use. There are various settings which can be configured by either physically altering switches on the device, or by the remote commissioning process. The following settings can be configured:
|
OPTION |
CONFIGURABLE |
DEFAULT |
|
Sample rate |
5 – 60 Minutes |
15 Minutes |
|
CO₂ Manual Calibration Enabled |
True or False |
False |
|
CO₂ Auto Calibration Enabled |
True or False |
True |
|
Fresh Air CO₂ Background Level |
400 – 600PPM |
470PPM |
|
Indoor CO₂ Background Level |
450 – 700PPM |
550PPM |
|
Particulate Matter Set Clean |
True or False |
False |
|
Particulate Matter Auto Clean Timer |
1-7 days |
7 Days |
|
Signal Telegram Transmission |
0-7 days |
1 day |
|
Repeated Telegrams |
True or False |
False |
|
Secure Mode |
ON/OFF |
OFF |
- Sample rate – how often the device reports its data and sends out a data packet.
- CO₂ manual calibration – a temporary mode to calibrate the sensor prior to use.
- CO₂ automatic calibration – a setting allowing the Indoor Air Quality sensor to continually auto-calibrate based on its environment (see below).
- CO₂ background levels – the default PPM values for outdoors and indoors are typically accurate, but in some environments, this might need to be changed.
- Particulate matter clean – setting this puts the particulate matter sensor into a cleaning mode to remove any detritus which might be affecting the readings.
- Signal telegram transmission – controls how often the device sends out a signal telegram which is used for performing Remote Management tasks.
- Repeated telegram – configure the device to operate as an EnOcean repeater.
- Secure mode – the Indoor Air Quality sensor includes an enhanced secure mode, where all radio communication is AES128 encrypted.
Note: These settings can be configured locally by interacting with the device or remotely using EnOcean commissioning software.
Local commissioning
On the rear face of the device, there are six DIP switches, which control the following settings:
|
DIP SWITCH |
FUNCTION |
|
DIP 1 |
Device power ON/OFF |
|
DIP 2 |
Sample period (see below) |
|
DIP 3 |
Sample period (see below) |
|
DIP 4 |
CO₂ manual calibration ON/OFF |
|
DIP 5 |
Repeater Mode ON/OFF |
|
DIP 6 |
Remote Commissioning ON/OFF (see below) |
Sample period
This setting controls how often the sensor sends the values to the gateway. It can be set by moving DIP switches 2 and 3 as follows:
|
DIP Switch 2 |
DIP Switch 3 |
Sample Time (minutes) |
|
ON |
ON |
5 |
|
OFF |
OFF |
15 |
|
OFF |
ON |
30 |
|
ON |
OFF |
60 |
CO₂ manual calibration
The Indoor Air Quality sensors CO₂ is calibrated during the manufacturing process to provide accurate readings, however it is strongly recommended that the device be re-calibrated prior to installation on site. To calibrate the device, carry out the following procedure:
- Place the device somewhere in a “clean” environment where normal background CO₂ levels can be found, such as in an area with no recent people traffic, away from any polluting sources, which has been unoccupied for long enough for CO₂ levels to settle to background levels.
- On the back of the device, move DIP switch 4 to ON and then press the LEARN button. This puts the device in manual CO₂ calibration mode. The LED on the device will flash every 30 seconds while the calibration takes place.
- Leave the device in the clean environment for 30 minutes, until the LED stops flashing. The sensor is now calibrated to recognise the level of CO₂ in the area as standard background CO₂.
- Move DIP switch 4 back to OFF to exit manual calibration mode.
- The device will now enter automatic calibration mode (unless this is disabled, see below) and will continually auto-calibrate over a 7 day period.
Repeater Mode
The Pressac IAQ sensor is also capable of acting as a repeater, extending the range of other Pressac sensors. To enable this feature, move DIP Switch 5 to “ON” and received EnOcean telegrams will be repeated.
By default, Repeater Mode is disabled. If it is enabled, the sensor will act as a Level 1 EnOcean repeater. Level 2 repeater functionality can be configured using EnOcean Remote Commissioning described below.
Remote commissioning
Tip: To perform remote commissioning, you will require an EnOcean USB dongle, this can be purchased by contacting our sales team at: https://www.pressac.com/buy/
You will also require the Pressac ProComm remote commissioning tool available here:
Note: Remote Commissioning Instructions are provided in the ProComm instructions.
Remote Commissioning Mode
All of the above settings and more can be configured through the remote commissioning process described below. To perform remote commissioning, the device needs to send a Signal Telegram, which allows it to be unlocked.
When Remote Commissioning is enabled by switching DIP switch 6 to “ON,” pressing the Learn button will send a signal telegram, and the device will be open to being unlocked by a Remote Commissioning telegram. More information is available in the ProComm Remote Commissioning instruction manual.
Note that in order to avoid conflicting settings, if Remote Commissioning is set to ON then all the other DIP switches (except the device power) will be overridden and ignored, as the device is set to remote commissioning mode.
If physical access to the sensor is not possible, then by default, the device will send a signal telegram periodically, removing the need to press the learn button to open the sensor to being unlocked. This value can be changed or disabled using the Remote Commissioning mode.
Secure Mode
Products can be switched between standard and secure modes by pressing the learn button for at least 10 seconds. The device’s mode will be changed when the learn button is released.
Note:
- Secure mode is indicated by the LED flashing GREEN four times.
- Standard mode is indicated by the LED flashing RED four times.
Products are delivered in standard mode with encryption turned off. Before enabling secure mode on the device, please ensure that the receiving device supports secure mode, and that it is enabled at the receiver.
Pressac EnOcean Gateways fully support EnOcean secure mode.
Registration
Pressac sensors need to be registered with a Pressac EnOcean Gateway in order to communicate with a cloud-based or local back-end system. There are two methods for registering a device, automatic or manual.
To add a sensor to a Pressac EnOcean Gateway, please refer to the Gateway instruction manual.
Restore factory settings
Turning off the MSP products power switch and holding down the learn button while turning back on the power switch will initiate restoration of the default settings and default remote management unlock code. While a restore is in progress, the LED will flash red four times, followed by a GREEN LED flicker if successful or a RED LED flicker if unsuccessful.
Technical specifications
|
Part Number |
SR_LIN_IAQ_E868 |
|
Wireless |
EnOcean |
|
Sensors |
CO₂ |
|
Security and Encryption |
AES-128 Configurable ON/OFF |
|
Remote Commissioning |
Yes |
|
Repeater |
Yes |
|
Telegram |
VLD |
|
EEP |
D2-14-5C |
|
Power Supply |
USB A Plug / Type N Barrel Connector (5.5mm OD, 2.5mm ID) |
|
Current Rating |
10mA Max |
|
Environment |
IP2X |
|
Mounting |
Screws or Rubber Feet |
|
Enclosure Material |
ABS |
|
Operating Temperature |
-10°C to +55°C |
|
Storage Temperature |
-20°C to +55°C |
|
Dimensions |
110mm x 110mm x 42mm approx. |
|
Measurement Ranges |
CO₂:0 – 5000PPM +/-60PPM +5% of reading |
Declaration of conformity
Download product datasheet