Product description
The Pressac ProComm Tool is a piece of Windows-based software used for configuring Pressac Sensing products. ProComm will provide a simple solution for adjusting Pressac Sensing device parameters.
ProComm can be downloaded here.
Note:To configure your Pressac devices using ProComm, you will require a Pressac EnOcean Dongle. This dongle is necessary for the proper functioning of the ProComm tool.
Available variants
| Frequency | Frequency type | Part number |
| 868MHz | EnOcean for Europe | PROCOMM_USB_E868 |
| 902MHz | EnOcean for US/Canada | PROCOMM_USB_E902 |
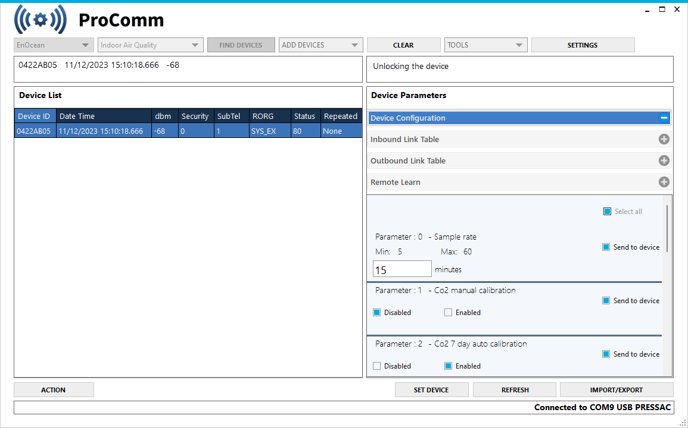
User interface overview
- Radio protocol drop-down menu: This dropdown allows you to select which type of device you wish to commission.
- Find devices: This button will find your mains powered devices automatically and populate the device list below.
- Add devices drop-down menu: This dropdown allows you to select the method of adding a device, the options are via learn button or via EnOcean ID.
- Clear: This button will stop all searching for devices and clears the devices inside the ‘Device List’.
- Tools drop-down menu: This dropdown currently only has the function for changing your device’s unlock code.
- Settings: This button will take you to the settings page of the ProComm.
- Device List: Device list will show the devices available for ReComm after adding them using the ‘add device’ function.
- Device parameters: This will show the current configurable settings for the device which you have selected.
- Action: This button will identify which sensor you are communicating with via the LEDs.
- Set device: This button will apply the changes you have made to the device parameters.
- Refresh: This button will refresh the selected sensor’s configuration to its current state after pressing the learn button.
- Import/Export: This button allows you to import or export DDF files to and from the ProComm software.
Adding devices
Mains-powered devices
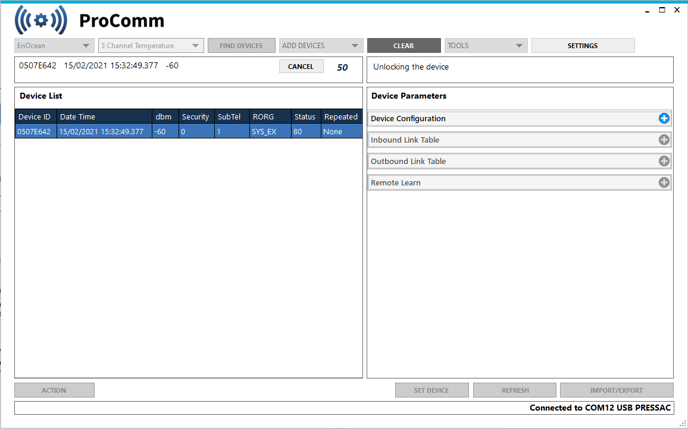
To add a mains-powered Pressac device to ProComm, select your device through the DEVICE TYPE drop-down menu, then click the FIND DEVICES button. Your device should automatically appear in the device list.
Battery-powered devices
Tip: There are two ways to add a Pressac device to ProComm: via Device ID and Learn.
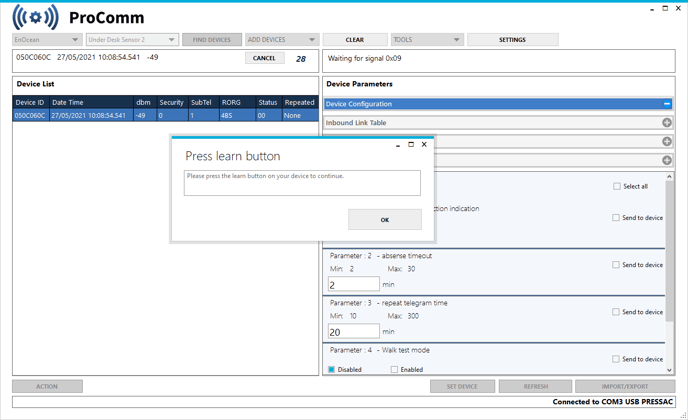
To add a device via Learn, select your device through the DEVICE TYPE drop-down menu, then select Add by Learn under the ADD DEVICES drop-down menu. This will initiate a 60-second countdown and you need to press the device’s Learn button within this time. If done correctly your device will appear in the device list.
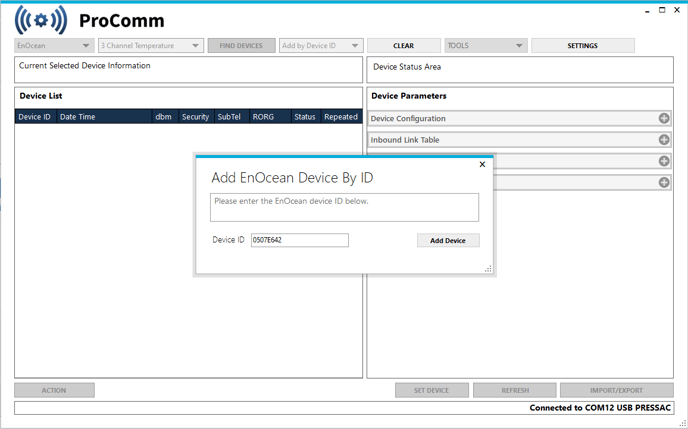
To add a device via Device ID, select your device through the DEVICE TYPE drop-down menu, then select Add by Device ID under the ADD DEVICES drop-down menu. Once you have done this a pop up will appear. Enter your device’s EnOcean ID. If done correctly your device will appear in the device list.
Configuring device parameters
Once you have added your Pressac device to the device list, click the device you wish to configure. Once you have done this “Unlocking device” will appear above the Device Parameters table. When this has completed you will be able to specify your desired configuration settings.
After specifying your configuration settings, click the SET DEVICE button. A dialog box will appear asking you to press the LEARN button on your device (this will expire after 30 seconds). Once you have pressed the LEARN button ProComm will configure your device.
Supported Pressac devices
Under Desk Sensor 2
When using the Under Desk Sensor 2 with ProComm you will be able to configure the following five fields with the ProComm tool.
- Parameter 1 – LED motion detection indication – Changing this parameter will allow you to configure the LED on the device. When LED motion detection indication is switched on the LED will light up green when motion is detected. When switched off the LED will remain off when motion is detected.
- Parameter 2 – Absence timeout – Changing this parameter will enable you to change the configurable time in which the Under Desk Sensor takes to send an unoccupied/no-movement message after no motion is detected.
- Parameter 3 – Repeat telegram – Changing the parameter will change the configurable time in which the Under Desk Sensor takes to a repeat telegram after no change in state has been detected.
- Parameter 4 – Walk test mode – When switched on the LED will become permanently RED. Each time motion is detected the LED will flicker green and a presence telegram will be transmitted. (Max, one telegram every 0.5 seconds). Once activated walk test mode will time out after 30 seconds.
- Parameter 5 – Learn button – When activated the button will be unable to send learn telegrams, activate walk test mode and change security options. Only factory restore functionality will remain possible.

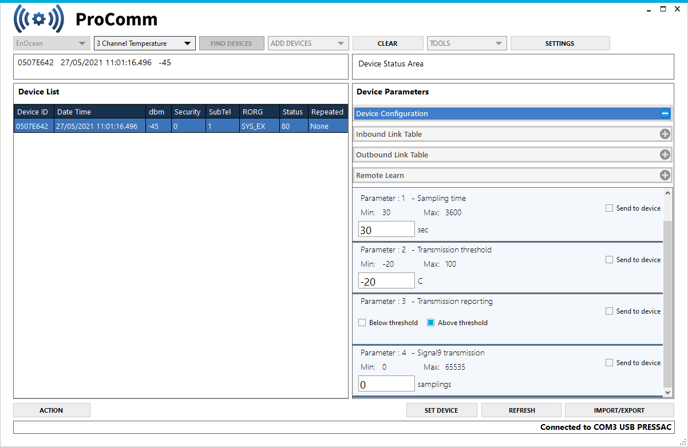
Three Channel Temperature Sensor
When using the Three Channel Temperature Sensor with ProComm you will be able to configure the following four fields with the ProComm tool.
- Parameter 1 – Sampling time – Changing this parameter will enable you to change the configurable time in which the Three Channel Temperature Sensor makes a reading.
- Parameter 2 – Transmission thresholds – Changing this parameter will enable you to change the configurable time in which the transmission thresholds can be used to force the Three Channel Temperature Sensor to only transmit a telegram when above or below a set temperature level.
- Parameter 3 – Transmission threshold reporting – Changing this parameter will allow you to set a temperature level, once the temperature is greater than the set level the device will send a telegram.
For example, if a transmission reporting threshold is set at 22ºC with transmission threshold reporting set to above. A telegram will only be sent when the temperature is greater than 22ºC.
If the temperature remains below the set threshold for more than 1 hour a telegram will be sent anyway. - Parameter 4 – Telegram transmission – Changing this parameter will enable you to change the configurable number of sampling times which must have elapsed for the Three Channel Temperature Sensor to send a telegram. e.g., if sampling time is set to 30 seconds and telegram transmission to 3, a telegram will be sent every 120 seconds.
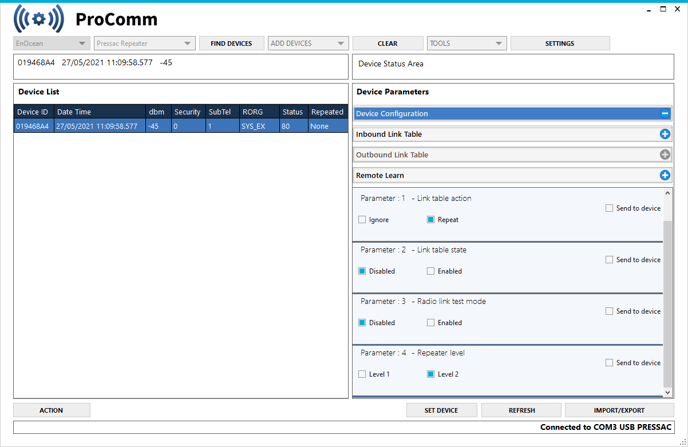
Pressac Repeater
When using the Pressac EnOcean Repeater with ProComm you will be able to configure the following seven fields with the ProComm tool.
- Parameter 1 – Link table action – When set to REPEAT all devices added to the link table will be the only devices repeated. When set to IGNORE the Pressac EnOcean Repeater will ignore all devices in the link table and repeat everything else.
- Parameter 2 – Link table state – With the link table switched OFF the Pressac EnOcean Repeater will repeat every telegram it receives. Switching ON the link table will enable selective repeating or ignoring depending on the link table action.
- Parameter 3 – Radio link test mode – This mode can help with both commissioning and range planning. When the Pressac EnOcean Repeater has radio link test mode switched ON, every telegram received from a device in the link table will be replied to with a standard EnOcean signal telegram which contains signal strength observed by the repeater.
- Parameter 4 – Repeater level – Configurable over the air Level 1 repeats only telegrams received from a device and Level 2 will repeat all telegrams including Level 1 repeated telegrams.
- Inbound link table – This table allows you to set which EnOcean sensors you wish to repeat up to 59 sensors.
- Outbound link table – This table allows you to set which EnOcean sensors you wish to repeat up to 59 sensors.
- Remote learn – This allows you to remotely learn EnOcean devices into your repeater.
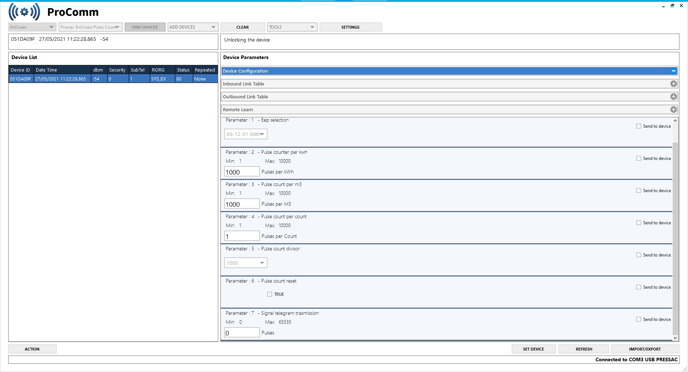
Pulse Counter
When using the Pulse Counter with ProComm you will be able to configure the following seven fields with the ProComm tool.
- Parameter 1 – EEP selection – This parameter will allow you to change the set EEP for the device between A5-12-01 (kWh), A5-12-03 (m³) and A5-12-00 (Count).
- Parameter 2 – Pulse counter per kWh – This parameter will allow you to change the amount of pulses between the measurement of each kWh between 1-10000.
- Parameter 3 – Pulse counter per m³ – This parameter will allow you to change the amount of pulses between the measurement of each m³ between 1-10000.
- Parameter 4 – Pulse count per count – This parameter will allow you to change the amount of pulses between the measurement of each count between 1-10000.
- Parameter 5 – Pulse count divisor – This parameter will allow you to change the amount of which you can divide the amount of pulses by, you have the option of 1, 10, 100, 1000.
- Parameter 6 – Pulse count reset – This will reset the cumulative count of the Pulse Counter.
- Parameter 7 – Signal telegram transmission – Changing this parameter will enable you to send signal telegrams after a defined number of pulses. This allows for remote commission to be available periodically. e.g. setting this to 1000 would make a signal telegram to be sent every 1000 pulses.
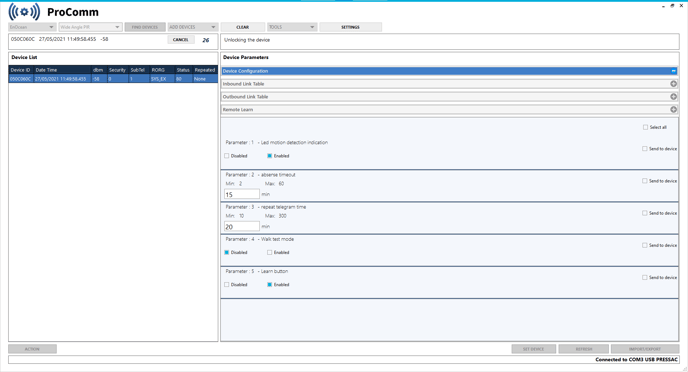
Wide Angle PIR
When using the Wide Angle PIR with ProComm you will be able to configure the following five fields with the ProComm tool.
- Parameter 1 – LED motion detection indication – Changing this parameter will allow you to configure the LED on the device. When LED motion detection indication is switched on the LED will light up green when motion is detected. When switched off the LED will remain off when motion is detected.
- Parameter 2 – Absence timeout – Changing this parameter will enable you to change the configurable time in which the Wide Angle PIR takes to send an unoccupied/no-movement message after no motion is detected.
- Parameter 3 – Repeat telegram – Changing the parameter will change the configurable time in which the Wide Angle PIR takes to a repeat telegram after no change in state has been detected.
- Parameter 4 – Walk test mode – When switched on the LED will become permanently RED. Each time motion is detected the LED will flicker green and a presence telegram will be transmitted (max, one telegram every 0.5 seconds). Once activated walk test mode will time out after 30 seconds.
- Parameter 5 – Learn button – When activated the button will be unable to send learn telegrams, activate walk test mode and change security options. Only factory restore functionality will remain possible.
Indoor air quality sensor
When using the Indoor air quality with ProComm you will be able to configure the following five fields with the ProComm tool.
- Parameter 1 - Sample rate – how often the device reports its data and sends out a data packet.
- Parameter 2 - CO₂ manual calibration – a temporary mode to calibrate the sensor prior to use.
- Parameter 3 - CO₂ automatic calibration – a setting allowing the Indoor Air Quality sensor to continually auto-calibrate based on its environment (see below).
- Parameter 4 - CO₂ background levels – the default PPM values for outdoors and indoors are typically accurate, but in some environments, this might need to be changed.
- Parameter 5 - Particulate matter clean – setting this puts the particulate matter sensor into a cleaning mode to remove any detritus which might be affecting the readings.
- Parameter 6 - Signal telegram transmission – controls how often the device sends out a signal telegram which is used for performing Remote Management tasks.
- Parameter 7 - Repeated telegram – configure the device to operate as an EnOcean repeater.
- Parameter 8 - Secure mode – the Indoor Air Quality sensor includes an enhanced secure mode, where all radio communication is AES128 encrypted.
Room conditions sensor
When using the room conditions with ProComm you will be able to configure the following five fields with the ProComm tool.
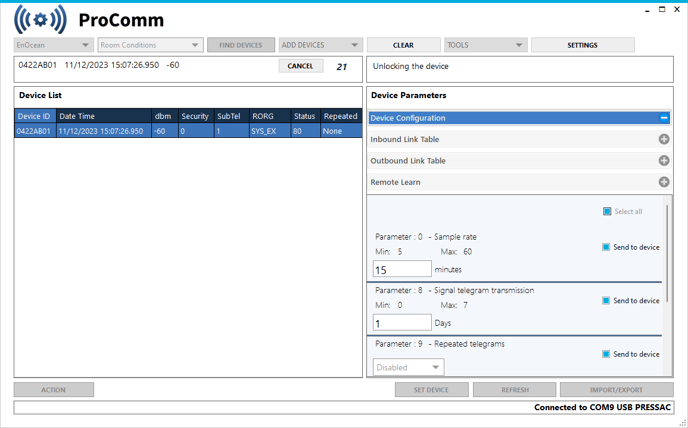
- Parameter 1 - Sample Rate – how often the device reports its non-occupancy data and sends out a data packet.
- Parameter 2 - Signal Telegram Transmission – controls how often the device sends out a signal telegram which is used for performing Remote Management tasks.
- Parameter 3 - Repeated Telegrams – configure the device to operate as an EnOcean repeater.
- Parameter 4 - PIR absence timeout – how long the occupancy sensor waits without activity before reporting “unoccupied”.
- Parameter 5 - PIR Repeat Occupancy Telegram – how often the occupancy sensor should repeat reporting “unoccupied” or “occupied” without the status changing.
- parameter 6 - Secure Mode – the Room Condition sensor includes an enhanced secure mode, where all radio communication is AES128 encrypted.