
Product description
A fully wireless, compact temperature sensor for efficient monitoring of ambient temperature. The sensor provides true peel and stick deployment, comes in two variations requiring little to no maintenance and can be rapidly fitted at minimal cost.

Key features and benefits
- Energy harvesting – powered by ambient light from the surrounding environment.
- Battery variation, for robust operation in dark environments.
- No wiring required – low cost of installation.
- Fast installation time – minimal disruption for retro fits.
- Optimal positioning – no wiring constraints.
Available variants
| Frequency | Type | Frequency Type | Part Number |
| 868MHz | Solar with battery back-up | EnOcean for Europe | MS_TEMP_BAT_868 |
| 902MHz | Solar with battery back-up | EnOcean for USA/Canada | MS_TEMP_BAT_902 |
| 928MHz | Solar with battery back-up | EnOcean for Japan | MS_TEMP_BAT_928 |
Installation
Place the sensor in an area of average room temperature keeping away from radiators, windows, ventilation units, cooling systems and any excess air movement. Ensure the solar panel gets as much light as possible.
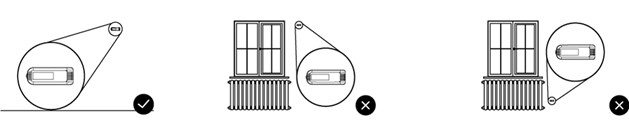

Note: Installing the mini series temperature sensor on the inside of an outside wall or directly over pipe work concealed in walls may negatively impact temperature measurement.
Once you have identified your desired surface, installation can be done using the adhesive pads or screws provided.
Adhesive pads installation
- Ensure the surface is clean and dry. Use the supplied alcohol wipe to prepare the surface if required.
- Stick the supplied self-adhesive pads to the bottom of the sensor.
- Peel off the self-adhesive pad’s protection film.
- Carefully stick the sensor to the desired surface.
Installation using screws
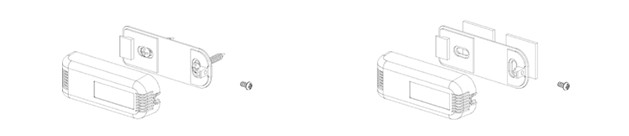
- Remove the screw from the side of the unit and lift the sensor from its backplate.
- Using the screws provided, screw the sensor’s backplate to the desired surface.
- Place the sensor onto the backplate.
- Replace the screw into the side of the unit and securely tighten.
Changing the battery
Estimated battery life using default settings assuming average use can be found in the technical specification section of this document. Changing the battery in the mini series temperature sensor can be done by following the steps below.
- Remove the screw from the side of the unit and lift the sensor from its backplate.
- Unplug the connected daughter board by gently lifting upwards.
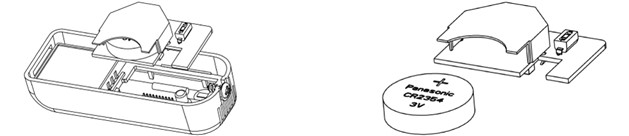
- Replace the battery in the battery holder.
- Plug the daughter board back into the main board.
- Place the sensor onto the backplate.
- Replace the screw into the side of the unit and securely tighten.
Activation
The mini series temperature sensor will be shipped in transport mode. Transport mode turns off the radio module during transit to reduce battery consumption, no telegrams will be sent while this is active. This mode can be changed by pressing the learn button and following the below procedures.
- Change from transport to standard mode
After pressing the learn button for one second then releasing, the sensor will enter standard mode. The device will send a standard learn telegram and the LED will flash once when successful. - Change from secure or standard to transport mode
After pressing the learn button for five seconds then releasing, the sensor will enter transport mode. The device will send a secure telegram and the LED will flash three times when successful.
Solar powered with battery back-up
Mini series temperature sensors equipped with a battery back-up require turning on prior to first use. You can do this by opening the back cover and sliding the switch to the ‘on’ position.

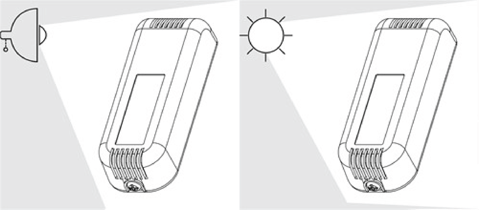
Solar powered only
Prior to first use, the sensor requires its power reserve charging. You can do this by placing the sensor in illuminance of at least 200lux for a minimum of five minutes.
Secure mode
The mini series temperature sensor includes an enhanced secure mode. When secure mode is turned on all device communication is encrypted by AES128. For more information, EnOcean’s full security specification can be found at https://www.enocean.com
Switching between modes
Note: Before changing the mini series temperature sensor’s operating mode please make sure the device is removed from all receiving devices it has been configured to work with. Failure to do so could result in ignored telegrams.
The sensor can be switched between standard mode and secure mode by pressing the learn button for five seconds, releasing for one second and then pressing again for five seconds. The device will send a secure learn telegram and the LED will flash twice when successful.
The mini series temperature sensor is delivered in transport mode with encryption turned off.
Commissioning
Adding the EnOcean mini series temperature sensor to an EnOcean radio network.
Note: If including a mini series temperature sensor in secure mode please ensure your receiving device is EnOcean security compatible.
- Ensure your sensor is within range of your EnOcean gateway or receiving device.
- Place your EnOcean gateway or receiving device into inclusion mode.
- Press the Learn button on the back of the sensor. The LED will blink once. The device will now transmit a teach in telegram.

- Wait for the teach in process to end. Please allow extra time if using secure mode.
- Successful inclusion will be indicated on the EnOcean gateway or receiving device.
The mini series temperature sensor can also be included into your EnOcean network manually. This can be achieved using the unique EnOcean ID and the EnOcean Equipment Profile (EEP). The EnOcean ID and EEP are printed on the product label.
Technical specifications
| Wireless protocol | EnOcean |
| Measurement range | Temperature 0ºC to 40ºC |
| Accuracy | +/-0.5ºC between 17°C and 27°C Else +/- 1°C between 27°C and 40°C |
| Transmission rate (dynamic) | 100 seconds if temperature change > 0.5°C else every 15 minutes |
| Battery life* (battery back-up only) | Up to 10 Years |
| Battery type (battery back-up only) | CR2354 |
| Repeater | No |
| Telegram | 4BS |
| Environment | Indoor |
| Enclosure material | PC-ABS |
| Calibration | Factory Calibrated |
| Operating temperature range | -20ºC to +60ºC |
| Storage temperature range | -20ºC to +60ºC |
| Dimensions | 76.5mm x 28mm x 17.5mm approx |
| EEP | A5-02-05 |
Note: *Typical life expectancy of the battery is dependent on ambient light conditions and use-case.